Windows 10 si sa è invasivo, vuole a tutti i costi che l'utente si integri con i vari tool Microsoft tra cui OneDrive, con cui ha un sodalizio difficile da rompere. Così capita che anche quando si è disinstallata l'applicazione di OneDrive, essa continui ad apparire nel menu ad albero di esplora risorse come semplice icona vuota... E' vero, non darebbe fastidio, ma se la si volesse rimuovere?
Ecco una semplice procedura testata su Windows 10 PRO 1709 (Fall Creator Update), ma che dovrebbe andare bene anche su altre versioni e precedenti build.
Aprite il registro di sistema con i provilegi di amministratore (cercate regedit ed eseguitela con il tasto destro cliccando su Esegui come amministratore), poi aprite il sequende percorso:
HKEY_CLASSES_ROOT\CLSID\{018D5C66-4533-4307-9B53-224DE2ED1FE6}
Sulla parte destra troverete la chiave System.IsPinnedToNameSpaceTree che ha il valore 1. Mettetela a 0 e chiudete il registry.
Et voilà, OneDrive è scomparso!
Visualizzazione post con etichetta Windows. Mostra tutti i post
Visualizzazione post con etichetta Windows. Mostra tutti i post
lunedì 18 dicembre 2017
martedì 29 marzo 2016
Windows 10 activation by phone
Windows 10 wants to live connected to the internet, it's clear. But there are some situations where it is not possible or it is mandatory forbidden.
In these cases you have to use the procedure to activate the Windows copy by phone. But how?
The activation menu, in fact, doesn't show clearly this possibility, but a workaround exists.
A renewed "Activation by phone" mask should appear and by following the wizard you should able to activate your authentic copy of the OS follow the step by step procedure by phone.
Credits: http://windows.microsoft.com/it-it/windows-10/activation-errors-windows-10
In these cases you have to use the procedure to activate the Windows copy by phone. But how?
The activation menu, in fact, doesn't show clearly this possibility, but a workaround exists.
- Log in using an administrative account
- Type "SLUI 04" in the search box of the menu
- Select and run the application you find
A renewed "Activation by phone" mask should appear and by following the wizard you should able to activate your authentic copy of the OS follow the step by step procedure by phone.
Credits: http://windows.microsoft.com/it-it/windows-10/activation-errors-windows-10
martedì 15 marzo 2016
How to retrieve Win product key from uefi using the command prompt
From many years, pc manufacturers don't use the label of Windows Product key anymore. This because UEFI bios has the possibility to store and protect that key.
This is a really limitation for an user who wants to restore the pc without having the recovery cd created soon after the first setup.
To partially overcome this problem, Microsoft gives you the possibility to retrieve the product key using the command prompt.
Here, the way to get it:
1) run the command prompt with administrative privileges
2) type the command:
wmic path SoftwareLicensingService get OA3xOriginalProductKey
lunedì 15 febbraio 2016
Dll and dynamic loading: tired to prototype function pointers?
Dll dynamic loading is used in a lot of contexts because give you flexibility and the power to change the code inside without touching the caller application. The base for a plugin architecture is the dynamic loading.
But this powerful has a cost in term of quantity of code to be written in order to map each of the function exported from the DLL. (yes, I know, it has also a cost in term of performance, but this is not the matter).
The code that I'm proposing is a shorter way, template based, to load dynamically a dll changing the approach used in the article called "DLLs the Dynamic Way" and based on MACROs.
My goal was to reduce the amount of the code to write, to code in more human language and to keep the advantage of the intellisense when I want to use the class wrapper fo the Dll.
Here a small unuseful Dll that exports only 2 functions:
Using the class, step 1: derive your own class from the LateHelper.
This class has been tested on Windows but only using cdecl calling convention for exported functions.
Suggestions or improvements are encouraged.
P.S. the script used to format the code has some bug displaying the template definition. Obviously the empty string added at the ned of the call of teh function MapMemberFunction are wrong.
But this powerful has a cost in term of quantity of code to be written in order to map each of the function exported from the DLL. (yes, I know, it has also a cost in term of performance, but this is not the matter).
The code that I'm proposing is a shorter way, template based, to load dynamically a dll changing the approach used in the article called "DLLs the Dynamic Way" and based on MACROs.
My goal was to reduce the amount of the code to write, to code in more human language and to keep the advantage of the intellisense when I want to use the class wrapper fo the Dll.
Here a small unuseful Dll that exports only 2 functions:
extern "C"
{
__declspec(dllexport) bool IsLoaded(void);
__declspec(dllexport) bool ChangeMe(unsigned char* buf, int buflen, int* lenOfBufChanged);
}
Generally, in order to load dynamically such dll you need to define 2 functions pointers in order to make your life easier when you call GetProcedureAddress/LoadLibrary and so on...
Something like this
typedef short int  (__cdecl *UCharIntIntPtr)(unsigned char*, int, int*);
[...]
UCharIntIntPtr _ChangeMe;
[...]
// we assume that the Library has been correctly loaded
_ChangeMe = (UCharIntIntPtr)GetProcAddress(dllHinst,"ChangeMe");
In order to correctly use this functions in a standard class you need also to wrap them:
class MyWrapper
{
public:
       bool ChangeMe(unsigned char* buf, int buflen, int* lenOfBufChanged);
}
This approach requires that you write a lot of code, almost the same code, every time you need to load a dll.
A different approach is based on my CMyLateHelper abstract class, defined in the file MyLateHelper.hpp freely downloadable here
Based on templates, this class does the dirty job for you, calling LoadLibraries and mapping the functions letting you free to write a more readable code.Using the class, step 1: derive your own class from the LateHelper.
class CDLLWrapper :
 public CMyLateHelper
{
public:
 CDLLWrapper();
 virtual ~CDLLWrapper(){};
        // to write less, you can simply copy/paste the signatures from export file of the dll
        bool ChangeMe(unsigned char* buf, int buflen, int* lenOfBufChanged);
        bool IsLoaded(void);
protected:
        virtual bool LoadFunctions(); // overload this member in order to map the functions of your dll

};
Setp 2: define your class and map the functions
CDLLWrapper::CDLLWrapper()
 :CMyLateHelper("MyDll.dll")
{
     // do some other if you need it
}

bool CDLLWrapper::LoadFunctions()
{
 try
 {
     if (!MapMemberFunction("IsLoaded"))
        return false;

     if (!MapMemberFunction("ChangeMe"))
        return false;

 }
 catch (...)
 {
  return false;
 }

 return true;
}

bool CDLLWrapper::ChangeMe(unsigned char* buf, int buflen, int* lenOfBufChanged)
{
   bool rv = false;

   try
   {
     rv = ExecuteIt("ChangeMe",buf,bufLen,lenOfBufChanged);
   }
   catch (...)
   {
     rv = false;
   }

 return rv;
}

bool CDLLWrapper::IsLoaded(void)
{
   bool rv = false;

   try
   {
     rv = ExecuteIt("IsLoaded");
   }
   catch (...)
   {
     rv = false;
   }

 return rv;
}
Now you can use the wrapper in your app. Remember to call Initialize method before to use the other member functions.
This class has been tested on Windows but only using cdecl calling convention for exported functions.
Suggestions or improvements are encouraged.
P.S. the script used to format the code has some bug displaying the template definition. Obviously the empty string added at the ned of the call of teh function MapMemberFunction are wrong.
giovedì 6 agosto 2015
Visual studio setup projects: how to use the same custom dialog box more than one time
Making a setup project using Visual Studio, 2005 version in my case, is fast and easy and it is my favorite tool for old projects.
A customization of the installation workflow is easy using custom action and custom dialog box.
The problem raises when you need 2 or more dialog box of the same type: dialog box with options, in example.
If you don't want to code your own dialog box and your own setup project, you can easily bypass such limitation with a little tip that I'm going to show.
A "Dialog box" derives from a template stored inside the main Visual Studio installation folder, usually
I suggest to make the first copy of the dialog in the subfolder 0 that it is the generic one and to copy it for each of languages supported, in example 1033, 1045 etc. etc. The only field that you have to change when you copy your wid file from the subfolder 0 to another one is the field Language of the table Module Signature that it has to be changed according to the specific language. So, if you are porting your new dialog template from the default folder 0 to the English folder 1033, Language field has to be 1033.
That's all!
A "Dialog box" derives from a template stored inside the main Visual Studio installation folder, usually
%ROOT%:\%PROGRAM FILES%\Microsoft Visual Studio 8\Common7\Tools\Deployment\VsdDialogs. This folder includes several subfolders, one generic and one for each of the supported languages. In example the subfolder called 1033 stores the templates for the English language. The goal is to find the template we need to use more then one time. In this example I'm going to modify the "2 options dialog" where its templates is called "VsdCustom2ButtonDlg.wid". Make a copy of this file calling it "VsdCustom2ButtonDlg_2.wid" and open it with ORCA. Because Visual studio check the presence of equal templates when you build a setup project, you have to keep the characteristics of the dialog, to have 2 option buttons in our example, renaming all the occurrences of the previous name. Open the file in ORCA and select the table Module Dialog. Change the name from Custom2Buttons to Custom2Buttons_2. Now iterate for each table and when you find the old name Custom2Buttons, change it with the new one. You have to generate also a new GUID for the field ModuleId of the table Module signature At the end, you can save it. Now your duplicated "2 options dialog" is ready to use and you can choose it in the "Add Dialog" menu of the "User Interface" sction of your setup project.
I suggest to make the first copy of the dialog in the subfolder 0 that it is the generic one and to copy it for each of languages supported, in example 1033, 1045 etc. etc. The only field that you have to change when you copy your wid file from the subfolder 0 to another one is the field Language of the table Module Signature that it has to be changed according to the specific language. So, if you are porting your new dialog template from the default folder 0 to the English folder 1033, Language field has to be 1033.
That's all!
martedì 29 gennaio 2013
Intercettare il codice di uscita di un processo lanciato dal prompt dei comandi
Questo brevissimo trick mostra come poter ricavare il codice di uscita di un processo lanciato mediante il command prompt.
Windows memorizza l'exit code nella variabile di ambiente ErrorLevel, quindi per ottenere questo codice basterà leggerla.
Esempio:
Ipotizzo di lanciare un processo con un parametro passato da linea di comando
mioprocess.exe -s
Alla sua chiusura, il comando
echo %errorLevel%
stamperà a video il codice di uscita.
venerdì 19 ottobre 2012
IExpress: eseguire file bat su Windows 64 bit bugfix
Microsoft fornisce gratuitamente un'utility, chiamata IExpress, che consente di creare pacchetti di files compressi autoestraenti.IExpress offre inoltre la possibilità di eseguire delle azioni, come lanciare un processo ad esempio, automaticamente al termine dell'estrazione
Maggior informazioni sull'utility IExpress possono essere trovate direttamente sul sito della Microsoft ai seguenti indirizzi TechNet e KB, oppure googlando nel web.
Sfruttando questa utility in un progetto mi sono imbattuto in bug mentre tentavo di far eseguire un piccolo script bat su una macchina con Windows 7 64bit.
Al termine della procedura automatica di estrazione del pacchetto, al momento di lanciare il bat, appare il messaggio: "Errore durante la creazione del processo < Command.com /C", come meglio esplicitato dalla seguente immagine.

Questo succede perché IEXpress tenta di eseguire lo script bat invocando la vecchia utility a 16bit Command.com che non è più presente sui sistemi a 64 bit.
Per ovviare al bug dobbiamo forzare noi la chiamata all'utility 32bit CMD.exe.
Per fare questo, durante il setup guidato dell'utility IExpress, anziché chiamare direttamente il file bat, dobbiamo anteporre la chiamata al processo cmd con parametro /c, come mostrato in figura

Maggior informazioni sull'utility IExpress possono essere trovate direttamente sul sito della Microsoft ai seguenti indirizzi TechNet e KB, oppure googlando nel web.
Sfruttando questa utility in un progetto mi sono imbattuto in bug mentre tentavo di far eseguire un piccolo script bat su una macchina con Windows 7 64bit.
Al termine della procedura automatica di estrazione del pacchetto, al momento di lanciare il bat, appare il messaggio: "Errore durante la creazione del processo < Command.com /C", come meglio esplicitato dalla seguente immagine.
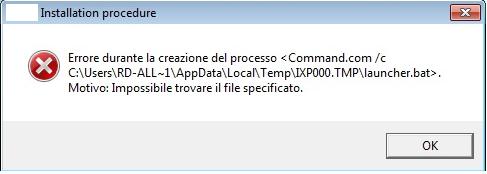
Questo succede perché IEXpress tenta di eseguire lo script bat invocando la vecchia utility a 16bit Command.com che non è più presente sui sistemi a 64 bit.
Per ovviare al bug dobbiamo forzare noi la chiamata all'utility 32bit CMD.exe.
Per fare questo, durante il setup guidato dell'utility IExpress, anziché chiamare direttamente il file bat, dobbiamo anteporre la chiamata al processo cmd con parametro /c, come mostrato in figura

mercoledì 4 luglio 2012
Windows Xp e sospensione
Non tutti sanno che anche in Windows Xp è possibile abiliatre la modalità sospensione che permette, risparmiando energia e batteria, di avere un boot in molti dei casi più veloce con già precaricata l'ultima sessione di lavoro.
Praticamente la modalità di sospensione differisce dallo stand-by perché non lascia acceso il computer, ma lo spegne salvando, però, tutto la sessione in un singolo file (hiberfil.sys) che verrà ricaricato poi al riavvio.
Di default questa possibilità è disabilitata.
Ecco alcuni semplici passaggi per attivarla.
Se da un lato non si consuma la batteria, dall'altro si andrà ad occupare una porzione di hdd nella partizione primaria. Occhio quindi allo spazio disponibile prima di abilitare questa modalità!
Praticamente la modalità di sospensione differisce dallo stand-by perché non lascia acceso il computer, ma lo spegne salvando, però, tutto la sessione in un singolo file (hiberfil.sys) che verrà ricaricato poi al riavvio.
Di default questa possibilità è disabilitata.
Ecco alcuni semplici passaggi per attivarla.
- Abilitare la funzionalità da pannello di controllo
- Pannello di Controllo
- Opzioni Risparmio Energia
- Sospensione -> Attiva Sospensione
- Abilitare il pulsante Sospendi nel menu di "Spegni computer" mediante la creazione di un'apposita chiave di registro:
- Fare clic su Start, scegliere Esegui, digitare regedit e quindi fare clic su OK.
- Individuare e quindi fare clic sulla seguente sottochiave del Registro di sistema: HKEY_LOCAL_MACHINE \ SOFTWARE \ Policies \ Microsoft \ Windows
- Pulsante destro del mouse su Windows, scegliere Nuovo, quindi Chiave.
- Nella casella Nuova chiave # 1, digita System, quindi premere INVIO.
- Pulsante destro del mouse su sistema, scegliere Nuovo, quindi Chiave.
- Nella casella Nuova chiave # 1 scatola, digita Shutdown e quindi premere INVIO.
- Dal menu Modifica, scegliere Nuovo, quindi Valore DWORD.
- Nel Nuovo valore # 1 box, digita ShowHibernateButton e premere INVIO.
- Pulsante destro del mouse su ShowHibernateButton, e quindi fare clic su Modifica.
- Nella casella Dati valore digitare 1, lasciare l'opzione Esadecimale predefinita selezionata e quindi fare clic su OK.
- Chiudere l'editor del Registro di sistema.
Se da un lato non si consuma la batteria, dall'altro si andrà ad occupare una porzione di hdd nella partizione primaria. Occhio quindi allo spazio disponibile prima di abilitare questa modalità!
giovedì 19 gennaio 2012
Disabilitare l'Autoplay di Windows
Una funzione scomoda, invasiva e fautrice di azioni sospette è sicuramente la funzione di Autoplay di Windows che, all'inserimento di un CD o di una penna USB, ne scansiona immediamente il contenuto lanciando un eventuale eseguibile di default residente su quel supporto.
Con questo trick è possibile disabilitare questa funzione seguendo pochi semplici passi:


Con questo trick è possibile disabilitare questa funzione seguendo pochi semplici passi:
- Cliccare Start -> Esegui
- Digitare gpedit.msc
- Nella finestra che appare cliccare su Criteri di proezione locali -> Modelli Amministrativi -> Sistema (vedi foto 1)
- Nel menu di destra cliccare sulla voce "Disattiva riproduzione automatica"
- Selezionare attiva e abilitare su tutte le unità (vedi foto 2)
- Cliccare su Applica, quindi chiudere il tutto.


sabato 24 settembre 2011
Windows Installer Resiliency: disabilitarla per alcuni files
Lavorando sulla creazione di pacchetti di installazione per i mie progetti mi sono scontrato con una caratteristica importante, ma nello stesso fastidiosa di Windows Installer, meglio conosciuta come resiliency.
Essa è un meccanismo di autoriparazione del servizio Windows Installer che sorveglia i files del vostro programma e li ripristina nel caso qualcuno fosse stato cancellato per errore.
Detta così potrebbe sembrare una buona cosa, ma spesso può intralciare il lavoro del programmatore, specialmente in tutti quei casi dove è il programma stesso a dover cambiare nome o cancellare i files installati con il pacchetto.
L'escamotage che Microsoft ci propone per bypassare il meccanismo è quello di disabilitare il componente WI nel caso in cui esso ostacoli il nostro volere.
Non mi sembra però una buona soluzione, soprattutto per i grandi effetti collaterali, quindi è più opportuno inibire il controllo sui files per i quali vogliamo avere la massima libertà di operare.
Il meccanismo della resiliency si basa sul valore della chiave KeyPath di ogni componente del pacchetto e che rappresenta il collegamento logico fra esso ed il file fisico. Rendendolo nullo, quindi, avremo la possibilità di escludere il check sullo specifico componente.
Per fare ciò sarà sufficiente aprire il pacchetto MSI precedentemente creato con il vostro ambiente preferito con ORCA e osservare il contenuto di due tabelle, principalmente: Component e File.
Nella tabella Component trovate il campo KeyPath, ma l'intero contenuto risulata illegibile a causa degli identificativi numerici usati. Per avere l'esatta corrispondenza fra il valore di KeyPath ed il nome del file dobbiamo avvalerci della tab File, come evidenziato nelle due immagini di seguito


Cancellare il valore di KeyPath nei componenti per i quali non desideriamo l'autorepair ci consentirà di liberarli dall'occhio vigile di Windows Installer
venerdì 29 luglio 2011
CRDupFileFinder - semplice utility per scovare i file duplicati

L'utility si basa sul confronto fra gli hash SHA1 dei files ed è freeware.
Sistemi operativi supportati: Microsoft Windos 2000 e superiori
Scaricalo qui
Iscriviti a:
Post (Atom)